[공학용 계산기] 천단위 자릿수 표시되는 모델들 (thousand separator ,)
-

- 2024.09.17 - 13:09 2015.01.23 - 00:25 21697 8
이미지 출처 : https://en.wikipedia.org/wiki/Decimal_separator
공학용 계산기에서 천자리수를 구분하여 표시하는 기능은 일반적이진 않습니다.
"지수적 표현이 가능하기 때문에 굳이 필요한가?" 라고 생각하는 듯 합니다.
그래도 엔트리급 모델에서는 이 기능이 종종 구현되는 기종이 있고,
thousand seperator / digit seperator / 3 digit punctuation
등등 회사마다 제각각 다른 이름으로 부르고 있습니다.
아래에 천단위 , 자릿수 표시 (thousand separator) 되는 공학용 계산기를 모아 봤습니다.
(시중에 판매되는 계산기 중) 아래 리스트에 없는 공학용 계산기는 일단 불가능하다고 보셔도 되겠습니다.
* 리스트에 빠진 모델이 있다면 제보 부탁드립니다.
- HP
[HP Prime]
[HP 35s]
- Casio
[fx-570MS], [350MS]
설정방법 [fx-350 ms] 소숫점 표시 & 천자리수 표시기호 의 변경. Dot(.) vs Comma(,)
http://www.allcalc.org/6298
[fx-991EX], [570EX], [350EX], [82EX] (2015년 2월 출시)
http://www.allcalc.org/2610
ㄴ , (컴마) 표시 구분이 아니라 빈칸 띄어쓰기로 표시됩니다. (os ver 따라 다른지는 확인 필요)
[fx-570CW] [fx-991CW]
https://www.tiktok.com/@thecalculatorguide/video/7273896353011387681
※ 주의 : fx-570ES, 350ES 는 구분 표시 안됨. (PLUS 모델 포함, 2nd Edition 포함)
- Sharp
[EL-509W], [506W], [509X], [506X], [520X], [531X], [5100TS]
주의 : 5200X 안됨
- TI
하나도 없는 듯?
공학용(과학용) 계산기에서는 유효 자릿수를 O.OOOO × 10k 또는 O.OOOOEOO 또는 공학기호(K, M, G, P, m, μ, n ...)로 표시하는 것이 일반적이므로, 컴마로 천단위를 구분할 필요가 없습니다.
거기다가 과거 계산기 액정 화소가 매우 큰 편이라서, 컴마를 액정에 추가하면 숫자 넣을 공간이 부족해지는 문제도 생기기 때문에 공학용 계산기에는 천자리 구분 기호를 표시할 수 없는 것이 일반적입니다.
-
25
댓글8
-
세상의모든계산기
해당 계산기를 직접 사용해보질 않아서 확실한 답변을 드릴 수는 없습니다.
하지만, 광고 팜플렛 사진을 보면 대략 답이 되실 듯 합니다.http://www.allcalc.org/2610
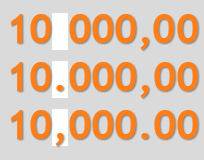
Three digits separated display function

Insert a comma every three digits, you can display large numbers also easier to understand.
 광고에는 위처럼 컴마가 찍혔는데, 실제로는 컴마 없이 그냥 한칸정도 떨어져서 표시되는 것 같기도 합니다.
 확인이 더 필요하네요.
[내용 추가] 제가 사용하는 fx-991EX 도 (컴마가 아니라) 3자리마다 한칸씩 띄어 표시되네요.
123 456 789 이런 식으로요.
세상의모든계산기 님의 최근 댓글
뉴턴-랩슨 적분 방정식 시각화 v1.0 body { font-family: 'Pretendard', -apple-system, BlinkMacSystemFont, "Segoe UI", Roboto, Helvetica, Arial, sans-serif; display: flex; flex-direction: column; align-items: center; background: #f8f9fa; padding: 40px 20px; margin: 0; color: #333; } .container { background: white; padding: 40px; border-radius: 20px; box-shadow: 0 15px 35px rgba(0,0,0,0.08); max-width: 900px; width: 100%; } header { border-bottom: 2px solid #f1f3f4; margin-bottom: 30px; padding-bottom: 20px; } h1 { color: #1a73e8; margin: 0 0 10px 0; font-size: 1.8em; } p.subtitle { color: #5f6368; margin: 0; font-size: 1.1em; } .equation-box { background: #f1f3f4; padding: 15px; border-radius: 10px; text-align: center; margin-bottom: 30px; font-size: 1.3em; } canvas { border: 1px solid #e0e0e0; border-radius: 12px; background: #fff; width: 100%; height: auto; display: block; } .controls { margin-top: 30px; display: flex; gap: 15px; align-items: center; justify-content: center; flex-wrap: wrap; } button { padding: 12px 25px; border: none; border-radius: 8px; background: #1a73e8; color: white; cursor: pointer; font-weight: 600; font-size: 1em; transition: all 0.2s; box-shadow: 0 2px 5px rgba(26,115,232,0.3); } button:hover { background: #1557b0; transform: translateY(-1px); box-shadow: 0 4px 8px rgba(26,115,232,0.4); } button:active { transform: translateY(0); } button.secondary { background: #5f6368; box-shadow: 0 2px 5px rgba(0,0,0,0.2); } button.secondary:hover { background: #4a4e52; } .status-badge { background: #e8f0fe; color: #1967d2; padding: 8px 15px; border-radius: 20px; font-weight: bold; font-size: 0.9em; } .explanation { margin-top: 40px; padding: 25px; background: #fff8e1; border-left: 5px solid #ffc107; border-radius: 8px; line-height: 1.8; } .explanation h3 { margin-top: 0; color: #856404; } .math-symbol { font-family: 'Times New Roman', serif; font-style: italic; font-weight: bold; color: #d93025; } .code-snippet { background: #202124; color: #e8eaed; padding: 2px 6px; border-radius: 4px; font-family: monospace; } 📊 Newton-Raphson 적분 방정식 시뮬레이터 미분적분학의 기본 정리(FTC)를 이용한 수치해석 시각화 목표 방정식: ∫₀ᴬ (2√x) dx = 20 을 만족하는 A를 찾아라! 계산 시작 (A 추적) 초기화 현재 반복: 0회 💡 시각적 동작 원리 (Newton-Raphson & FTC) Step 1 (오차 측정): 현재 A까지 쌓인 파란색 면적이 목표치(20)와 얼마나 차이나는지 계산합니다. Step 2 (FTC의 마법): 면적의 변화율(미분)은 그 지점의 그래프 높이 f(A)와 같습니다. Step 3 (보정): 다음 A = 현재 A - (면적 오차 / 현재 높이) 공식을 사용하여 A를 이동시킵니다. 결론: 오차를 현재 높이로 나누면, 오차를 메우기 위해 필요한 가로 길이(ΔA)가 나옵니다. 이 과정을 반복하면 정답에 도달합니다! const canvas = document.getElementById('graphCanvas'); const ctx = canvas.getContext('2d'); const iterText = document.getElementById('iterText'); // 수학 설정 const targetArea = 20; const f = (x) => Math.sqrt(x) * 2; // 피적분 함수 f(x) = 2√x const F = (x) => (4/3) * Math.pow(x, 1.5); // 정적분 결과 F(x) = ∫ 2√x dx = 4/3 * x^(3/2) let A = 1.5; // 초기값 let iteration = 0; let animating = false; // 그래프 드로잉 설정 const scale = 50; const offsetX = 60; const offsetY = 380; function drawGrid() { ctx.strokeStyle = '#f1f3f4'; ctx.lineWidth = 1; ctx.beginPath(); for(let i=0; i 2026 04.11 참값 : A = ±2√5 근사값 : A≈±4.472135954999579392818347 2026 04.10 fx-570 ES 입력 결과 초기값 입력 반복 수식 입력 반복 결과 2026 04.10 파이썬 코드 검증 결과 초기값: 5.0 반복 1회차: 4.5000000000 반복 2회차: 4.4722222222 반복 3회차: 4.4721359558 반복 4회차: 4.4721359550 반복 5회차: 4.4721359550 초기값: 10.0 반복 1회차: 6.0000000000 반복 2회차: 4.6666666667 반복 3회차: 4.4761904762 반복 4회차: 4.4721377913 반복 5회차: 4.4721359550 2026 04.10 감사합니다. 주말 잘 보내세요. 2026 03.06